Nov 9, 2021 | 14 minutes
Automated Lead Routing: 3 Solutions for Busy Sales Teams
Learn how to create three automated lead routing systems to increase the efficiency of your sales teams.

Lead routing is an instrumental process to increase the efficiency of sales teams, but it can be difficult to find an automated system that works for your business.
Perhaps this is where you are now: Aware of what the business requires, but unsure of what direction to go.
When considering automated lead routing solutions, the first step towards getting the right one is understanding the lead routing approach that suits the profile of your business.
In turn, this will allow you to determine the rules that will govern the required automated lead assignment system.
For example, it is not rare for companies with dedicated territory (or country) representatives to pursue a system that automatically assigns leads to the corresponding rep depending on the lead’s location.
In this case, an incoming lead from, say, Kansas would be automatically assigned to the company’s Kansas representative by the system.
For other businesses, the priority resides in giving sales representatives the same opportunities. This is an excellent alternative for keeping the competitive spirit up and also to set the groundwork for accurate measuring of team performance down the line.
Here, the approach to lead routing will likely be tilted towards a round-robin distribution system that assigns leads in a perfectly equal way.
There are other methods as well, but the point is clear: The lead routing system has to be in line with your business needs, the sales team configuration, and dynamics.
In this tutorial, we will show you how to create the aforementioned lead routing systems from scratch, and also include a third option for your consideration.
Let’s get right into the action.
1. The automated round-robin lead routing system
The scenario below is helpful for sales teams that receive leads via digital forms and manage them with HubSpot.
It works in a quite straightforward way. First, it instantly receives new Typeform responses.
Then, it assigns the lead randomly to a sales representative, and at the same time removes the picked representative from the next random selection.
Next, it notifies the rep via email, adds the lead as a contact in HubSpot, and assigns the rep to the same contact.
Once all the reps on the team have been assigned a lead, the scenario will be able to assign leads randomly again.
To create this scenario, you will need accounts for the following apps:
Typeform
Airtable
Gmail
HubSpot
Make
Also, please use this Airtable base for the scenario to work correctly. Now, let’s move on to step 1 of the process.
Step 1: Adding the Typeform app
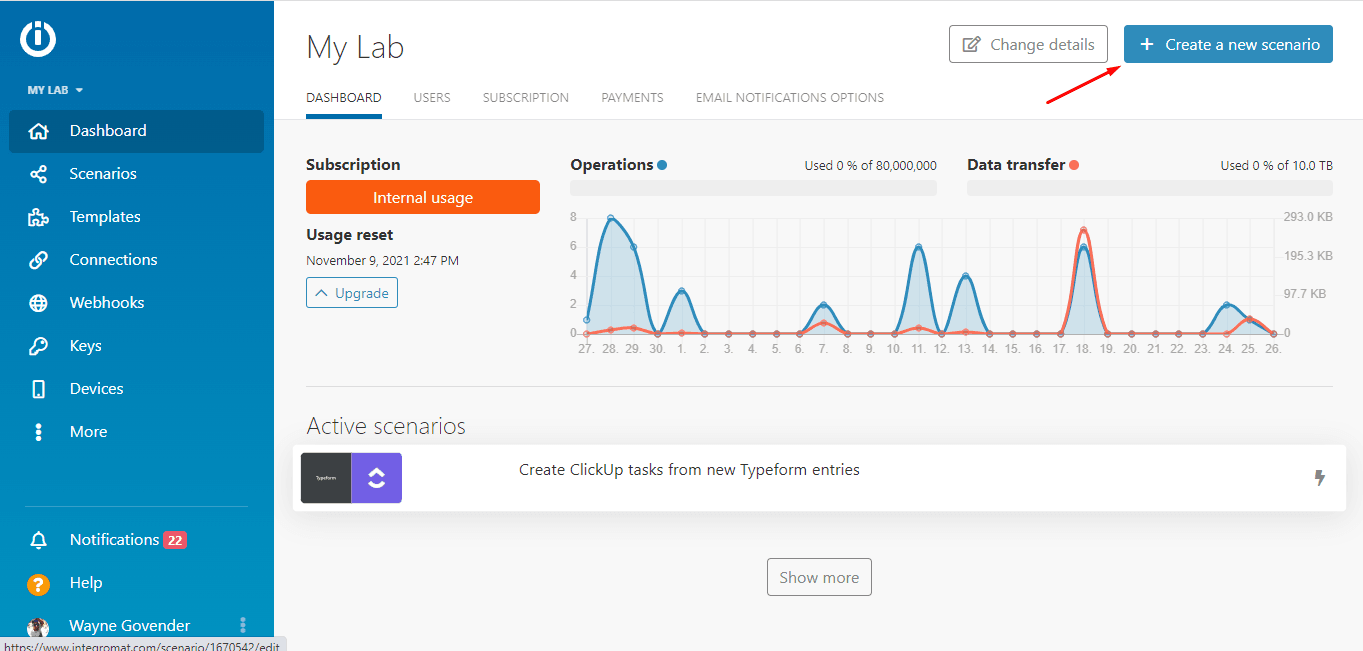
After you log in to your Make account, you will be taken to your dashboard. Here, click the “Create a new scenario” button located on the top right of your screen.
This will take you to the scenario builder, where you will notice a blue circle with a cursor sitting in the middle of your screen.
Click on it and the app list will appear.
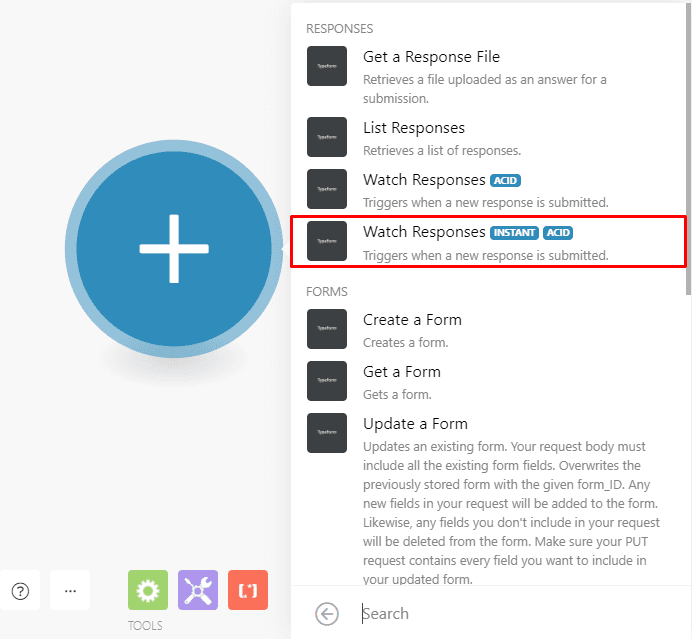
In there, search for Typeform and select it. A list of the available modules (triggers, actions, and searches) will be displayed.
Typeform has an instant module that uses a webhook to instantly receive the form’s responses. Let’s use this module which is called “Watch responses”.
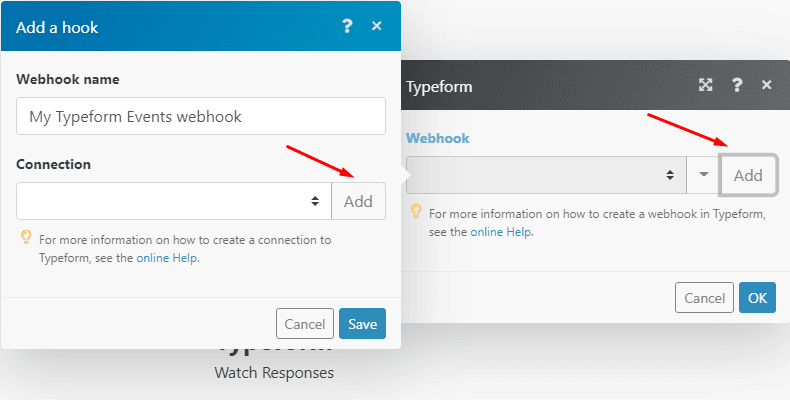
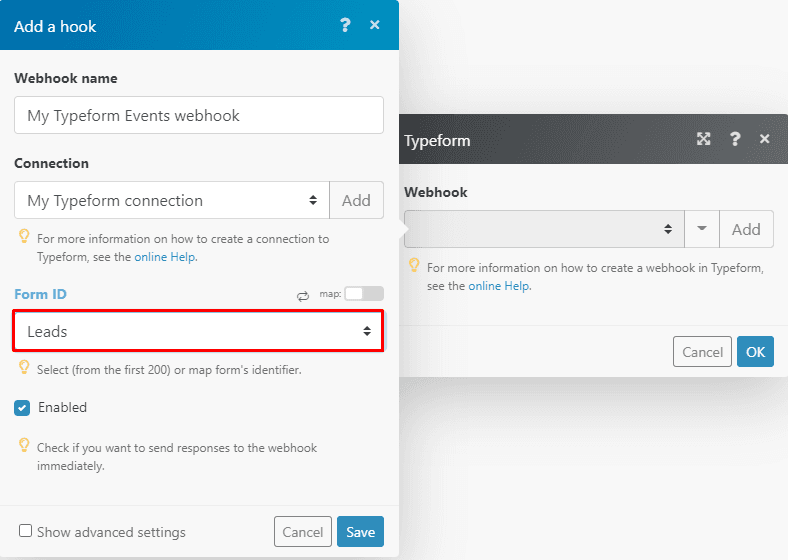
Now, we need to create a webhook. In the module’s configuration box, click the “Add” button and give the webhook a name.
Next, click the “Add” button in the webhook configuration box (the one you’re on) to connect your Typeform account to Make.
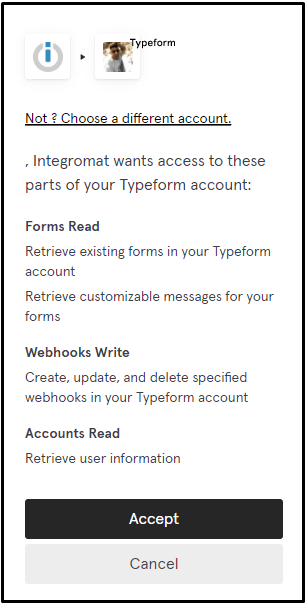
Then, click “Connect”, and in the pop up screen hit “Accept”.
After doing this, select the form you want to watch for responses and hit “Save”.
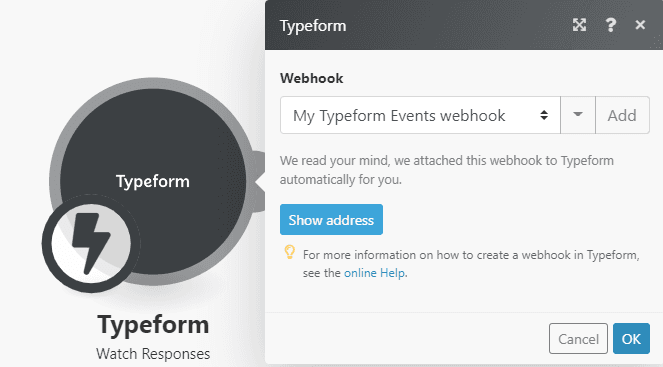
The webhook is now configured and automatically attached to your selected Typeform, so you don't need to do anything more here. Once done, hit “OK”.
Step 2: Adding the Airtable app
Before we continue configuring the scenario, let’s check out the Airtable base quickly.
You’ll notice the “Sales reps” and the “Lead assigned” columns, which are important here.
When a rep is assigned with a lead, the “Lead assign” column is automatically ticked, which removes that rep from the next randomized selection. This gives all the reps a fair chance, which is what we are after here.
Once all the reps have been assigned with a lead (all ticked), this column is reset automatically (ticks removed), and all the reps will be able to receive leads randomly again.
Also, there’s a field for the rep’s Hubspot contact owner ID. Stay put, we’ll show you how to get this info later on.
The next step is to integrate Airtable with Typeform, so back to the Make scenario.
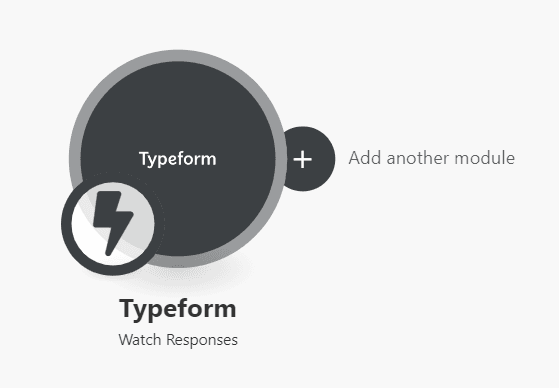
Hover your cursor on the Typeform module and you’ll see a little circle on the right side of it.
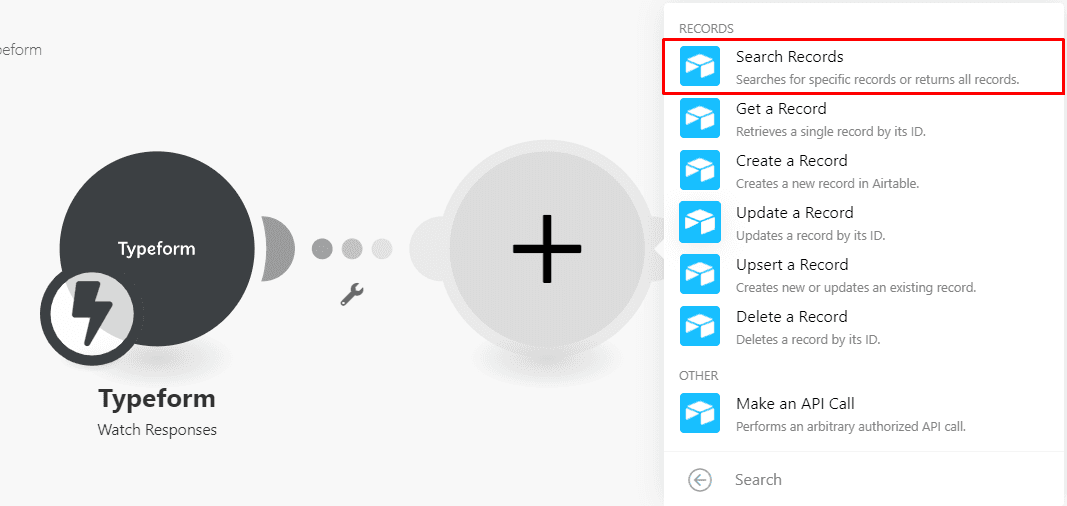
Click it so you can add the next app: Airtable.
Similarly, you will see a list of options on a pop up. Search for the Airtable app, and select the “Search records” module.
In the module’s configuration box, connect your Airtable account to Make like you did with Typeform.
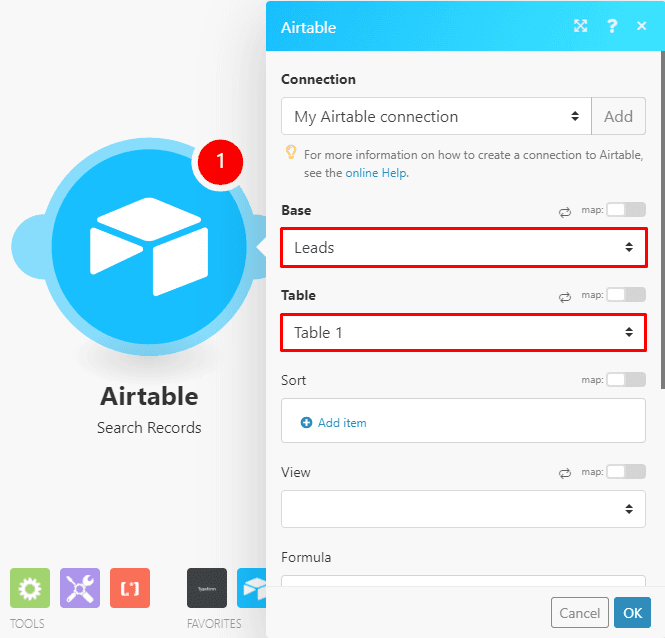
Once the connection is established, select the base that we’ve provided and the table.
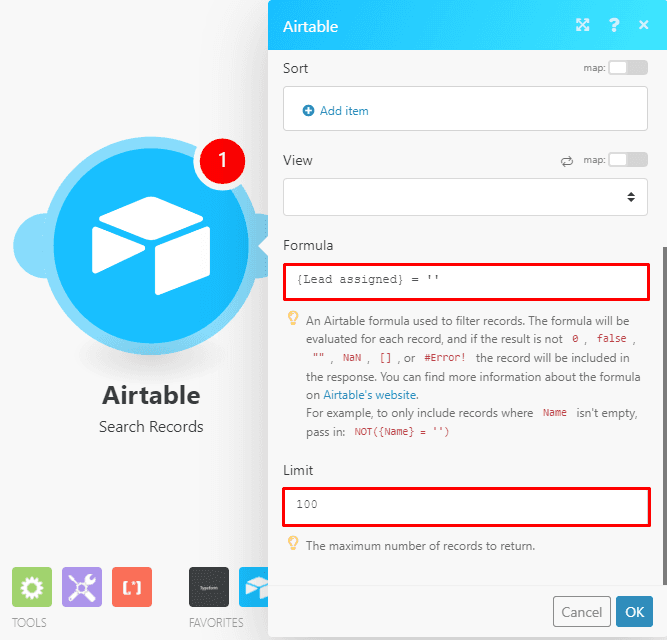
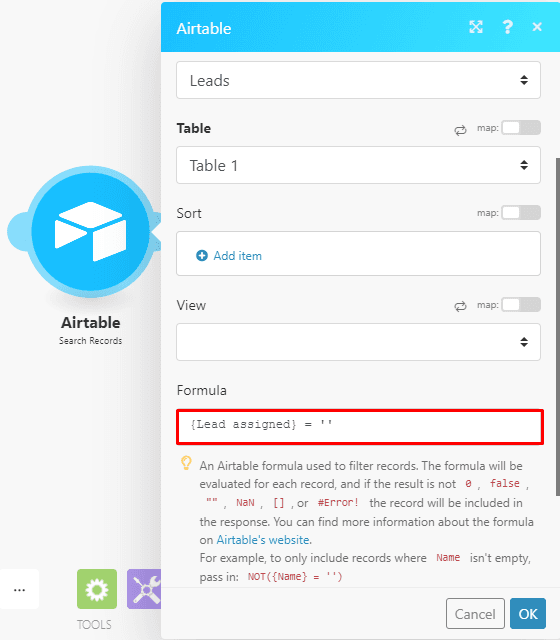
Airtable allows you to use a formula to search for specific records. Remember that we are searching for reps that haven’t been assigned a lead yet (therefore, not ticked).
Copy this formula and paste it in the “Formula” field, which in turn will return the required records:
{Lead assigned} = ' '
Below that is the “Limit” field. What’s this for?
When the scenario executes, the number in this field represents how many records Make will return during that execution. Set this to a high number so that you don't accidentally miss any records.
So this module will retrieve all the records containing sales reps that haven’t been assigned with a lead. But as it stands, the Airtable module searches for the records on the table from top to bottom, and not randomly as we want.
However, there’s a way to randomly select the reps:
First, combine all the individual Airtable records returned by the search into a single bundle of data - in other words, aggregate the data.
Then, shuffle the aggregated data and select the first record automatically.
Let us show you how to do that.
Step 3: Adding the array aggregator and variable modules
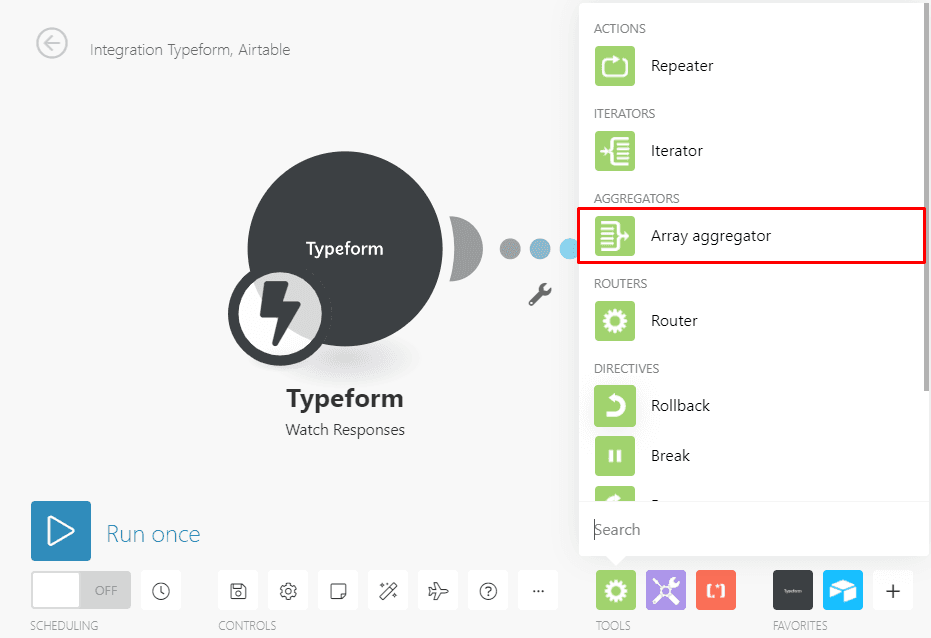
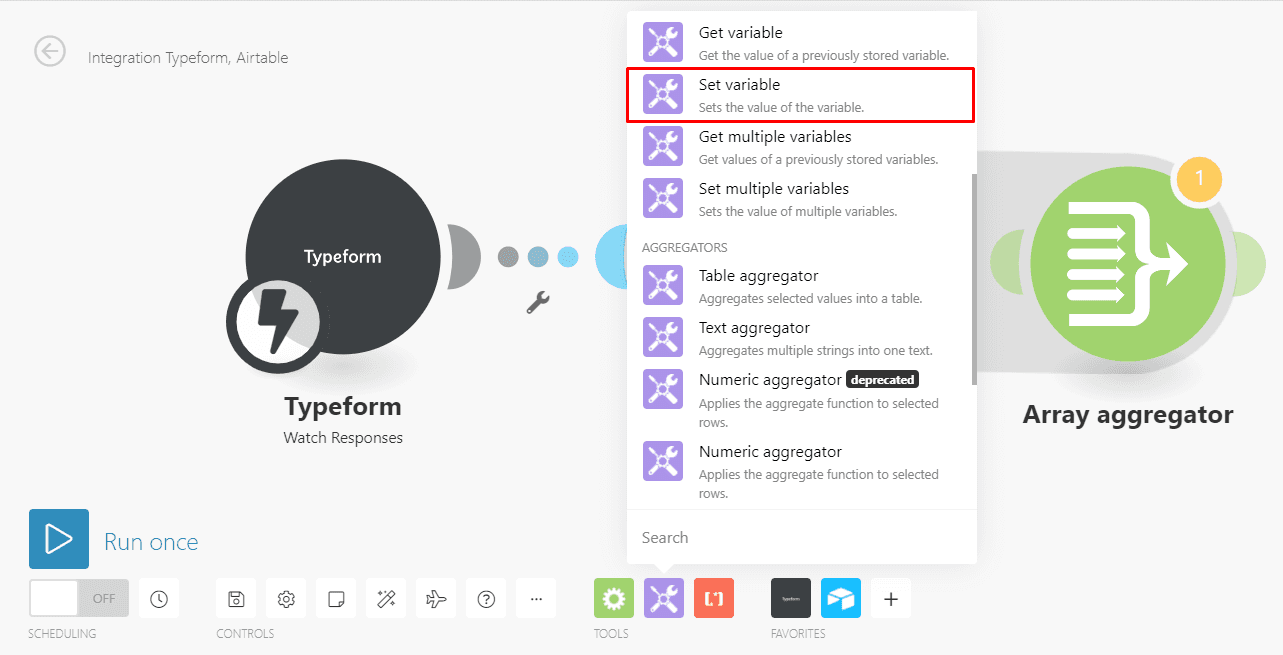
At the bottom of the scenario builder, there’s a Tools menu.
Click it, select the “Flow Control” option, and then select the “Array Aggregator” and attach it to your scenario by dragging it over the Airtable module.
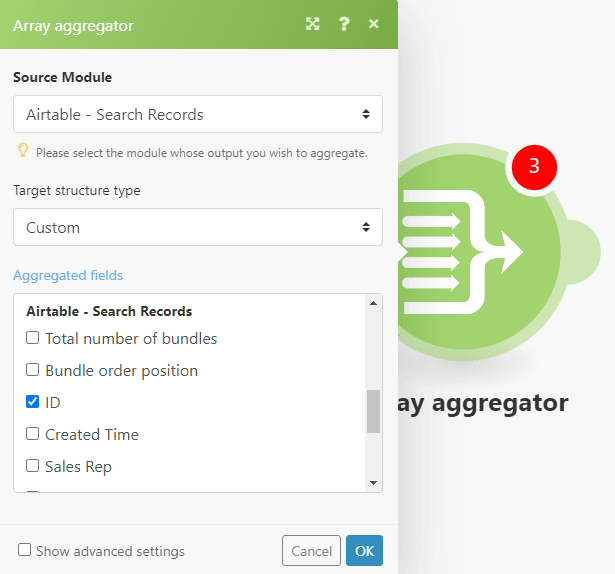
In the array aggregator’s configuration box, the first field you see is “Source”.
Since you want to aggregate the Airtable records, select this as the Source. The “Target structure type” is automatically selected for you, so all you need to do is tick ID under Airtable > Search records in the “Aggregated fields” box.
Now that the records IDs are aggregated, the next thing to do is shuffle the data.
To do this, you need to create a variable first. Make has a module that will do that.
Down in the Tools menu, select the “Set variable” module and attach it to the array aggregator.
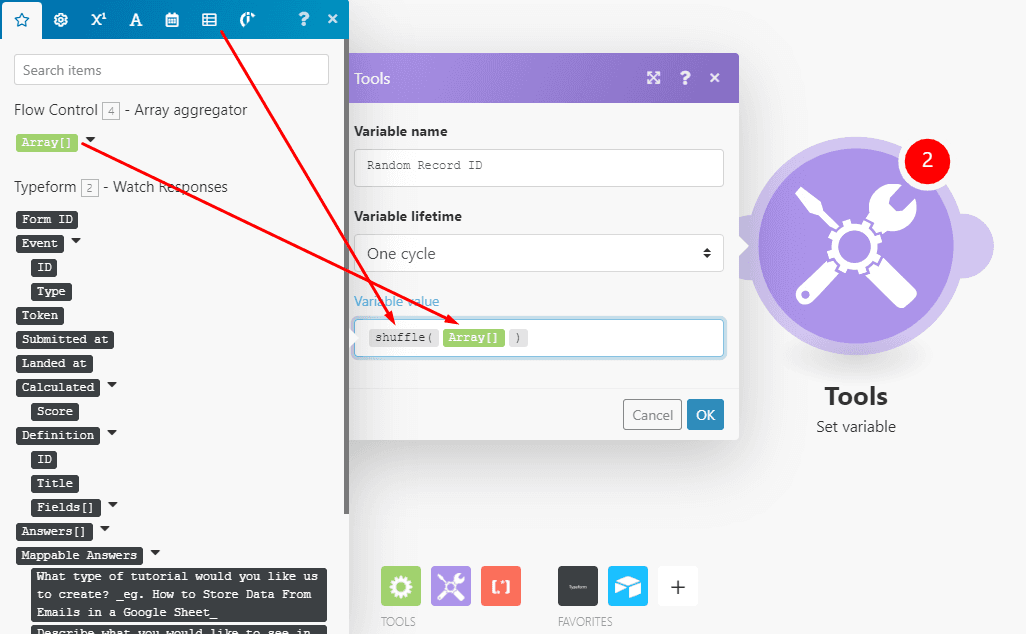
In the configuration box of the “Set variable” module, start by giving the Variable a name.
Next - in the Variable value field - select the Shuffle function (found under the Functions for working with arrays tab) and map the Array element within the parenthesis like you see below.
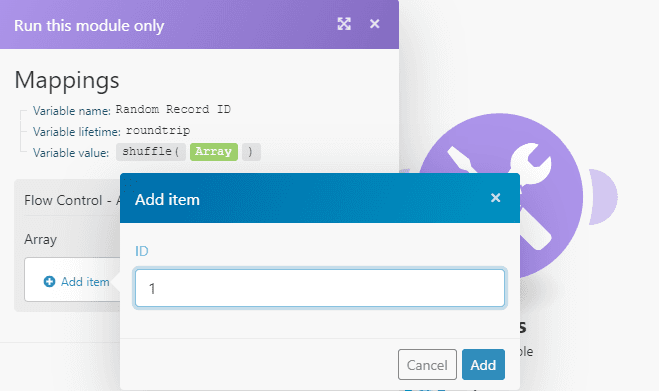
For this module to output the correct data (that we will need for the next module in the scenario), you need to run the module first.
So, right click on the module and select the “Run this module only” option. Click add item, enter any value, hit “Add” and then “OK”.
Now, let’s select the sales rep using the random record ID.
Step 4: Updating Airtable records
Let’s keep building the scenario by adding the “Airtable > Update a record” module. Again, select the same base and table we’ve been using all along.
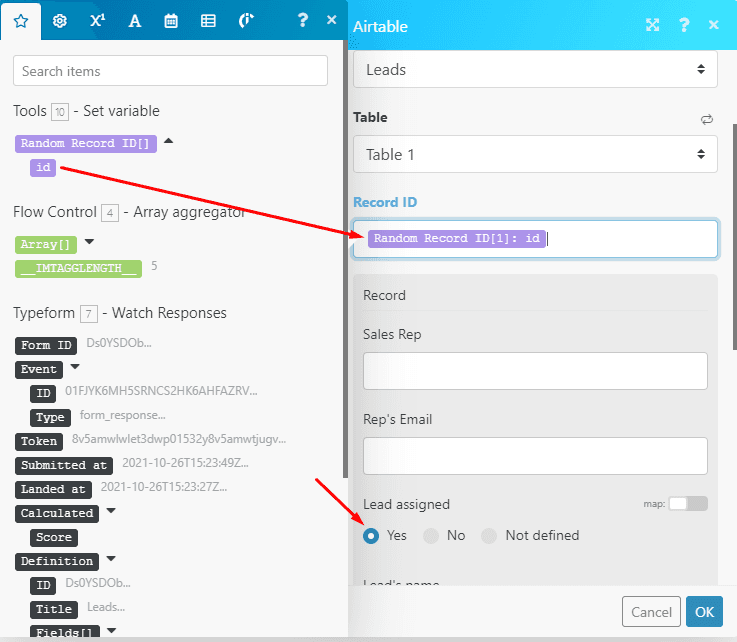
In the “Record ID” field, map the ID element outputted by the “Set variable” module.
Scroll down until you see the “Lead assigned” option and select “Yes”.
This is the option that will automatically tick the field on the table once the rep has been assigned with a lead.
Once done, hit “OK”, and move to the next step.
Step 5: Adding the Gmail and HubSpot modules
Now that the sales rep has been assigned the lead, it’s time to email the lead’s details to the rep, as well as add both parties (lead and rep) to HubSpot.
So, in your scenario, add the Gmail app and choose the “Send an email” module.
Note: This works with a business account, so if you’re using a personal account, please follow the additional steps shown in the module.
The email addresses of the reps are already on the Airtable table so let’s map it in the module.
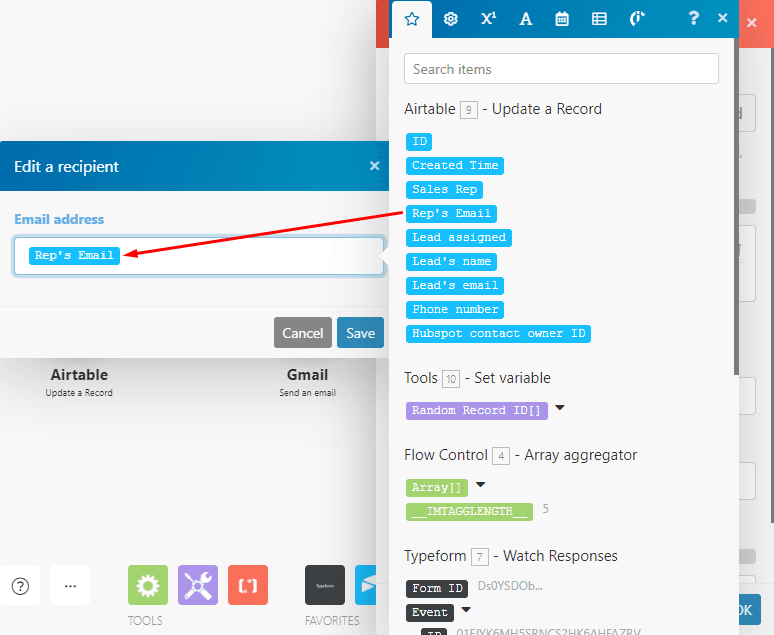
Click “Add a recipient” and map the “Rep’s Email” element to the “Email address” field.
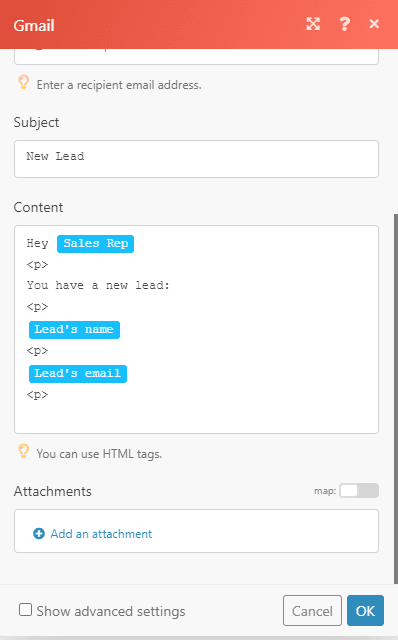
Feel free to add a subject line and content that you want to use to compose the email. You can map the elements from the “Airtable > Update a record” module similar to what you see here.
Once you finish with the Gmail module, hit “OK”.
Since we need to add the lead as a contact with the assigned sales rep to Hubspot CRM well, let’s proceed to add the corresponding HubSpot module to our scenario.
Search for the HubSpot CRM app and select the “Create/Update a contact” module.
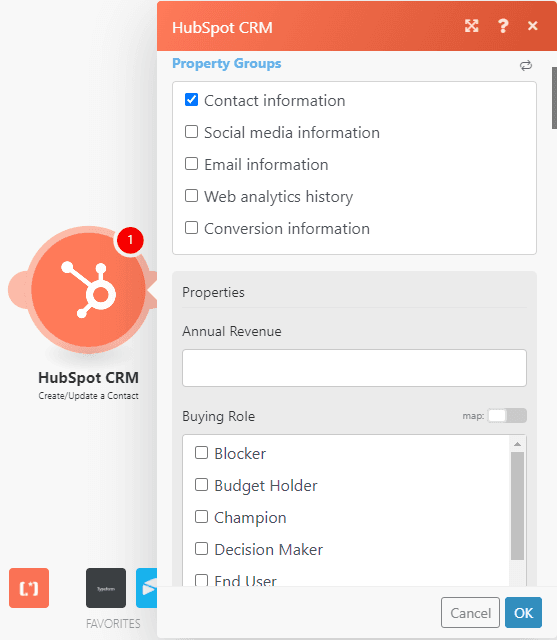
After you connect your HubSpot account to Make, tick the “Contact information” option in the “Property group” box and scroll down until you see the “Contact owner” field.
In the second step of this tutorial we mentioned that the Airtable base has a field for the sales rep’s HubSpot contact owner ID that you should add manually.
This is important so that when the lead gets created in HubSpot, the rep gets assigned automatically as the lead’s contact owner.
You’re probably asking yourself how to get the contact owner’s IDs. Well there's an easy way to do this.
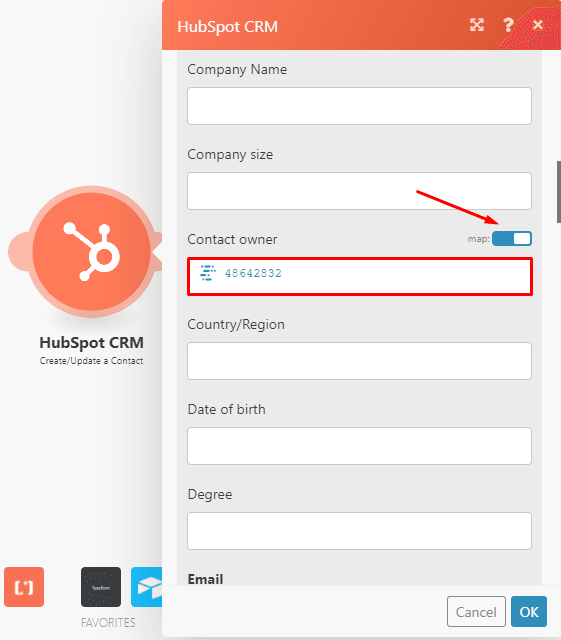
In the “Contact owner ID” field of the HubSpot module, select a rep and simply toggle the map switch to “on”.
This will display the ID of that rep. Repeat the process for all your reps and add them to the table. See the screenshot below for reference.
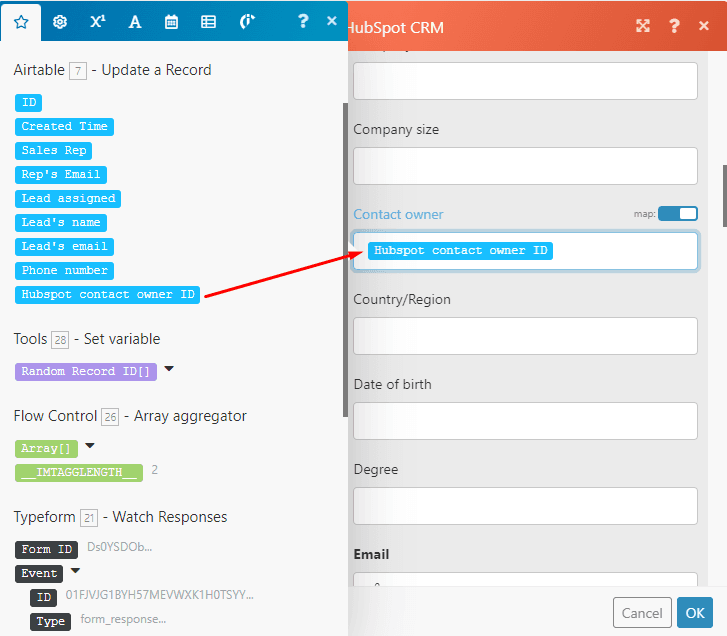
Once all the reps have their contact owner IDs in Airtable, map the “HubSpot contact owner ID” element from the “Airtable > Update a record” module to the “Contact owner” field to make it dynamic.
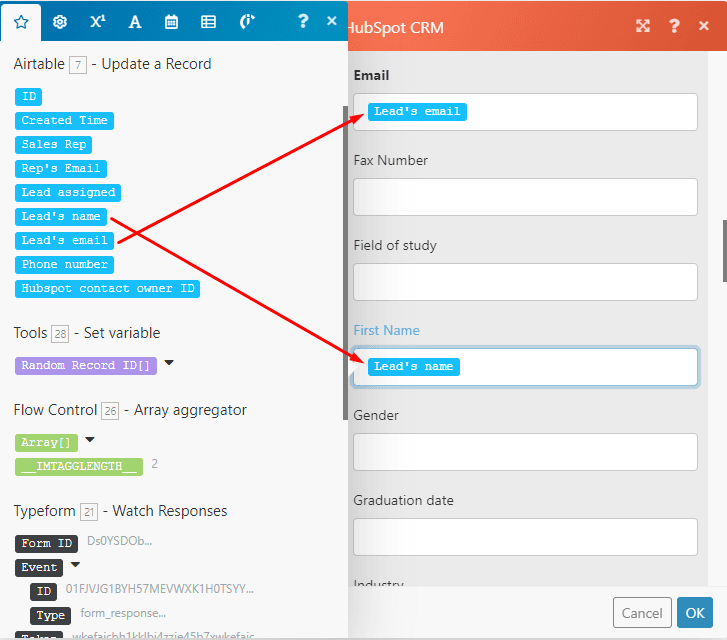
Next, map the Lead’s email and Lead’s name elements from the Airtable module to the matching fields in the HubSpot module.
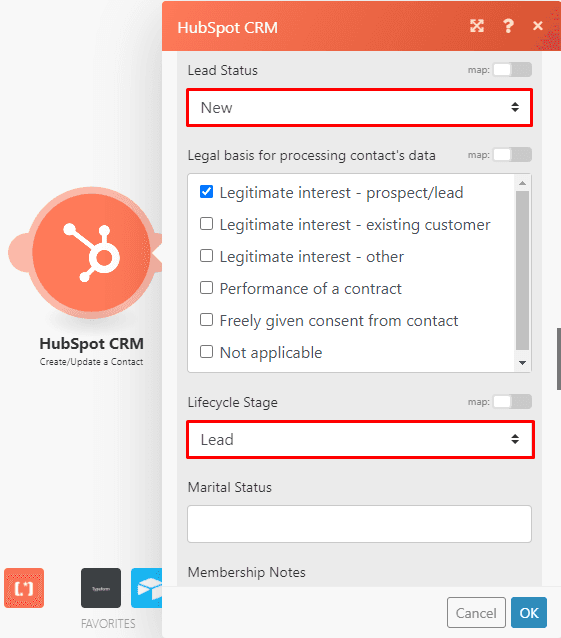
Scroll down a little further and choose the following options as shown in the screenshot below.
Step 6: Adding the Airtable modules that reset the “Leads assigned” field
Once all the sales reps have been assigned a lead, the “Leads assigned” column must be unticked/cleared so everyone is able to receive new leads again.
This means that after a rep is assigned to a lead, that column must always be searched to check if that was the last rep that got a lead.
To do this, we will use the “Search records” Airtable module (identical to the one you used earlier in this scenario). In order to make things faster, just right-click on that module, clone it and attach it to the HubSpot module on your scenario.
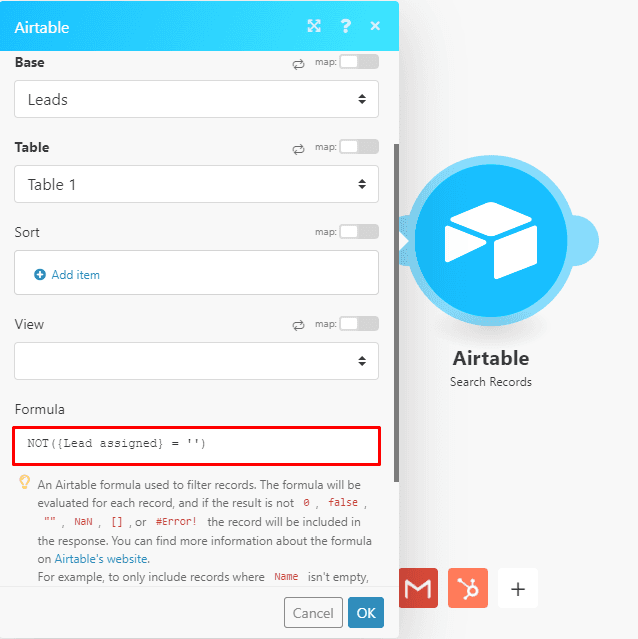
Then, check that the Airtable module (the one you just cloned and added) is configured as it should be:
As the formula suggests, this module searches if the “Leads assigned” column has any empty or unticked records. If all fields are ticked, the module will output 0 bundles of data.
We’ll use this info to filter out records, which is important.
Proceed by adding another “Search records” Airtable module to the scenario, which we’ll configure in a bit.
Then, click on the link between the modules to open the filter menu.
In order for data to pass this filter, the previous module must output 0 and as we mentioned earlier, outputting 0 means that all the reps have been assigned with a lead (and thus, there are no unticked fields).
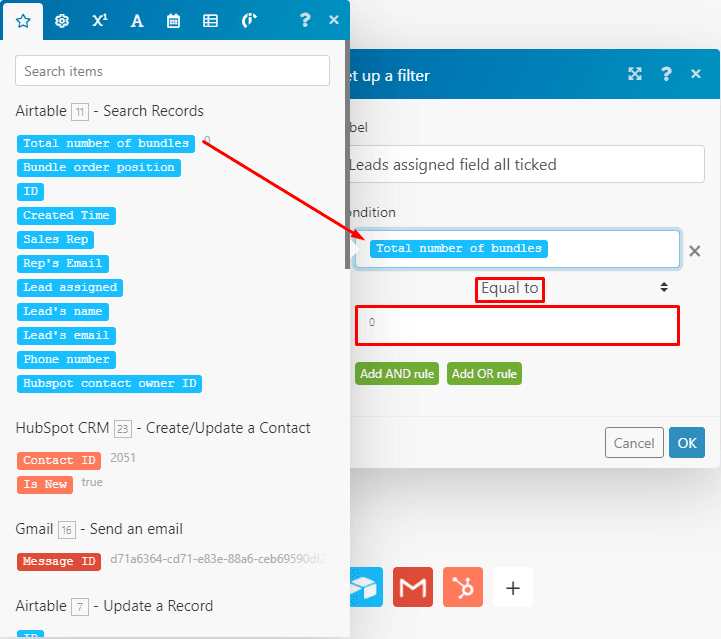
In the filter configuration box, give the filter a name and then map the “Total number of bundles” element from the previous “Search records” module to the top field.
Select the “Equal to” operator (ensure it’s the numeric option) and then enter 0 in the bottom field. That’s all we need to set up the filter, so once done hit the “OK” button.
Okay, now open the new “Search records” Airtable module (the third one on your scenario).
If the bundles of data pass the filter, we know that the “Leads assigned” field must be cleared for all the records so that the reps can be assigned with leads again.
Use this formula to grab all the records on the table:
NOT({Lead assigned} = '')
Also, don’t forget to increase the number in the “Limit” field to a high number.
Hang in there as we reach the last module in the scenario.
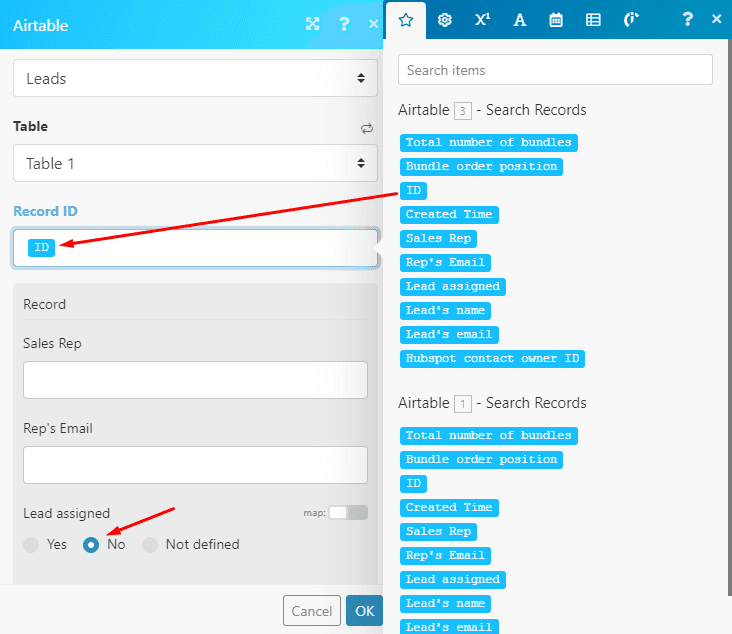
Add the “Airtable > Update a record” module, which will clear the “Lead assigned” column so the process can start again.
In the module’s configuration box, map the ID element outputted by the previous “Search records” Airtable module and select the “No” option under “Lead assigned”. This will do the job of clearing the column for you.
Step 7: Testing the scenario
Congrats, you made it to the final and most fun step - executing the scenario.
Turn your attention to the bottom left of the scenario builder. Hit the blue button named “Run once”. Then head over to the Typeform form and submit one for testing purposes.
Check out what the execution looks like below (the email and HubSpot contact are not shown).
Since you submitted one form, only one rep has been assigned with a lead on your Airtable table (and on HubSpot as well). This is also the reason why the last three modules weren’t executed.
However, we are sure that you want to see the entire scenario execution, right?
Here’s what you can do: Simply tick all the rep’s lead assigned field and leave one empty like this:
Hit “Run once” again, submit another form like you did before, and this is what you should see:
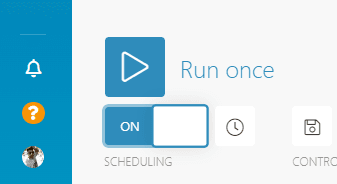
To activate the scenario, hit the switch at the bottom of the builder.
And that’s it!
You now have a fully functional automated lead routing system that operates with a round-robin rule.
Now, let’s move on to the next solution: An automated lead routing system that sends leads to different teams based on a different set of rules.
2. Routing leads to different sales teams
It’s pretty common for a company to have different sales teams handling different types of leads.
These leads can be categorized in different ways. For example:
By company type: Small, Medium, Enterprise
By geographical location like countries or continents
By lead score
For instance, you may have a specific team allocated to each company type and you want leads to be automatically, but also properly assigned to each of those teams.
This can be easily done by slightly cloning and the tweaking the previous scenario.
Let’s stick with the company type example.
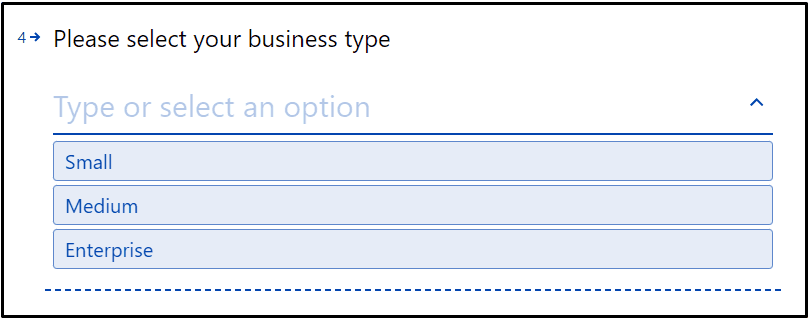
The form should contain a multiple choice question similar to: “Please select your business type”.
And in Airtable, you need to make a few adjustments.
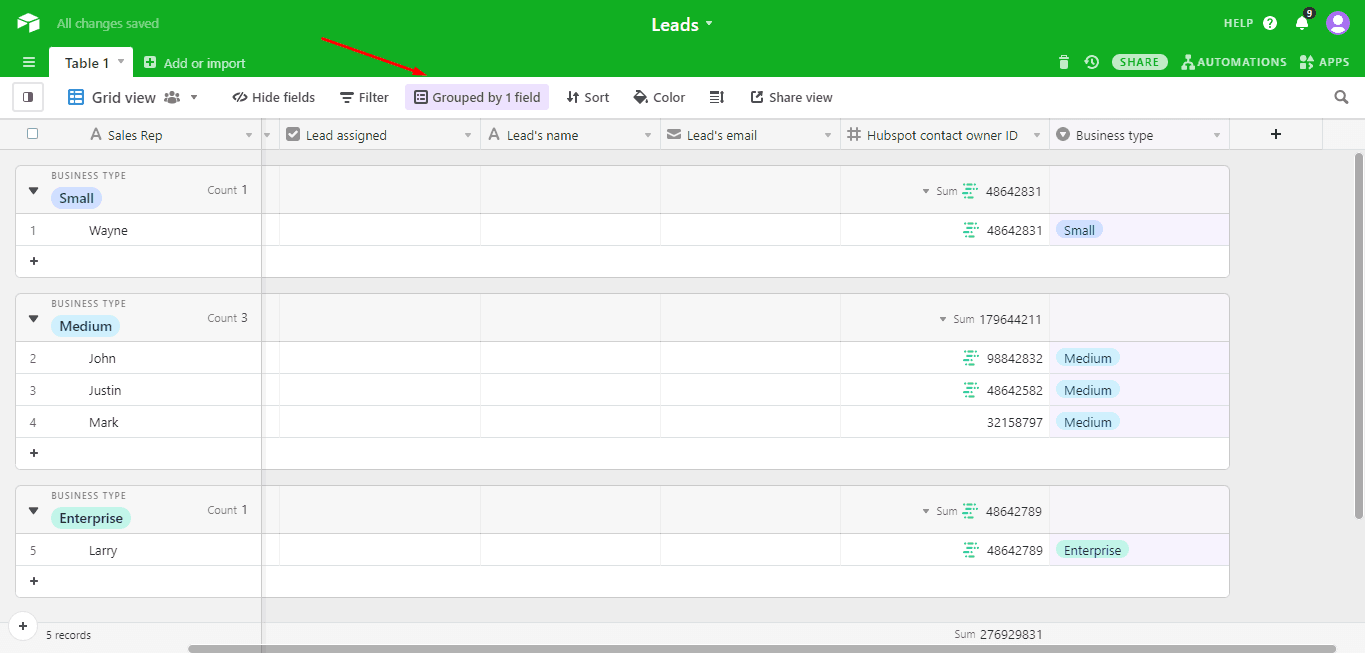
First add a “single select” column - let's call it “Business type” and add the various options.
Please note that the options in Airtable (Small, Medium, Enterprise in this case) must be an exact match to the answers selectable on the form for the scenario to work correctly.
Depending on which rep is handling each type of lead, assign it to them accordingly. It should look like this:
Lastly, hit the “Group by” option and select the “Business type” column again - now you have everything organized.
That’s it for Airtable - now, let’s get back to the scenario.
All that you need to change is the formula in the three “Search records” Airtable modules.
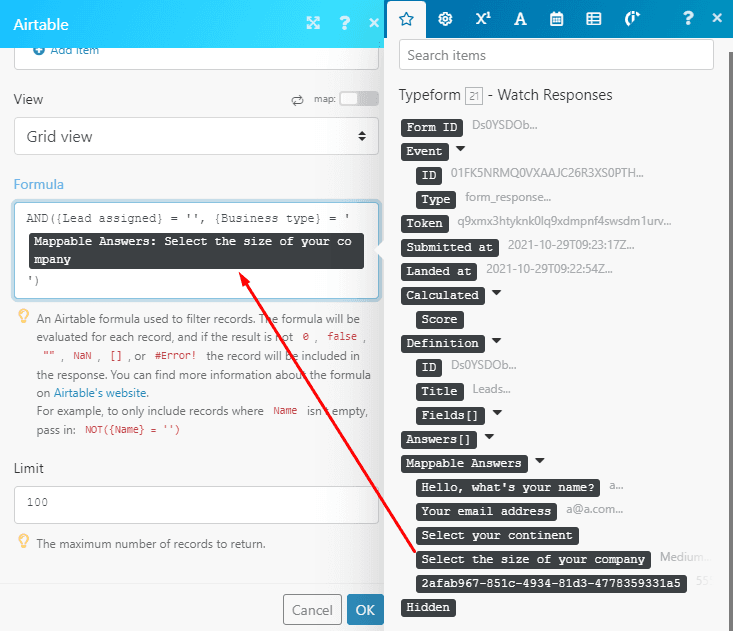
In the first two modules, use this formula and replace Typeform answer with the answer element.
AND({Lead assigned} = '', {Business type} = 'Typeform answer')
For the third module, use this formula.
AND(NOT({Lead assigned}) = '', {Business type} = 'Typeform answer')
Below you can see what the formula will look like in the modules.
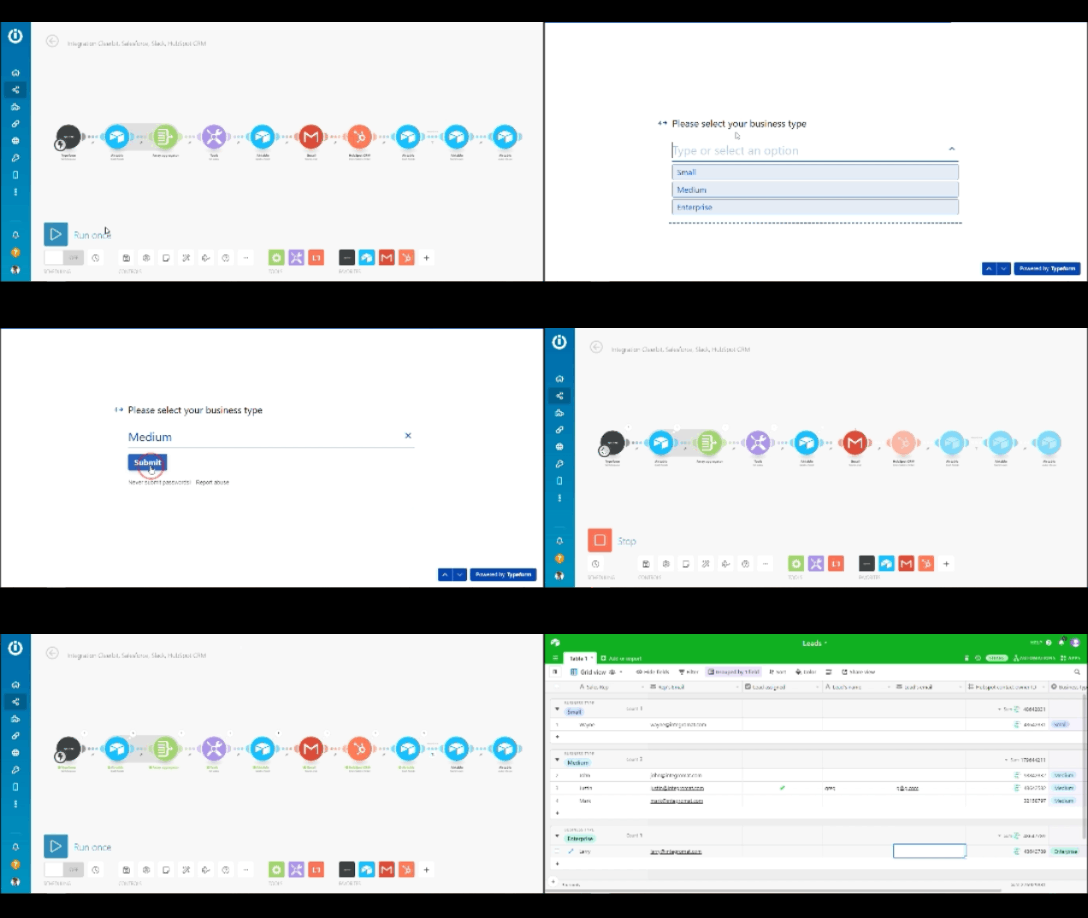
You’re probably curious to see the scenario in action so here you go:
3. Bonus scenarios: Automated lead routing by source
At Make, we try to make things as easy as possible for you to get up and running with your automations.
Below, you will find templates that you can use to collect leads from LinkedIn ads or Facebook ads depending on which one you’re using.
The first template lets you receive LinkedIn Lead Generation Ads submissions and add them as new rows on a Google Sheets spreadsheet for your sales team to tackle ASAP.
Maybe you want to notify a person or team on Slack every time there’s a new LinkedIn Lead Generation Ads form submission. The following template will take care of that for you.
When you receive new leads from your Facebook Lead Ads, you can also send Slack notifications to anyone or any team that you want if you use this template, cutting the response time quite a bit.
Lastly, there’s this template, which will take your new Facebook leads and instantly create deals in Pipedrive to save your sales team time and assist them in closing the deals faster.
The takeaway
As you have learned, setting up an automated lead routing system can be lengthy at first, but once you get it running it will work in the background and save you precious time on a recurring basis.
Most importantly, these Make-powered solutions are both efficient and affordable, sparing you from complicated app onboarding processes, extra expenses spent on consultants, and difficult contracts.
The endgame will consist in having an automated lead assignment system that will increase the efficiency of your sales teams, setting everyone up for success from the moment the system starts running.
Happy automating!
Ready to make the automation revolution happen?

Wayne Govender
Solutions Architect at Make who loves all things tech with a focus on workflow automation. Also enjoys fitness and spending too much time on YouTube.


