Aug 8, 2024 | 5 minutes
How to automatically get better leads from your Facebook ads: A step-by-step guide

Facebook is one of the most powerful platforms available for generating new leads.
With over 3 billion users logging in to the app or website for an average of almost 20 hours a month and a typical conversion rate of about 8.25% across all industries, it’s easy to see why.
However, to make the most of the extraordinary reach available, and to achieve the best possible ROAS, marketers can consider clever ways to develop their Facebook and Instagram ad campaigns.
Top of the list? Automatically enabling the system to generate high quality leads – not only a high quantity.
Automatically maximize your ROAS
This can be achieved by ‘talking’ to Facebook about exactly which leads progress well through your CRM sales funnel, so Facebook can optimize ads to reach people who are more likely to also progress well.
Doing this manually is almost impossible, but it can be set up to happen automatically using Make.
This guide (accompanied by the video below) will walk you through the process of setting up Conversions API for CRM on Make.
Why use Conversions API for CRM on Facebook?
This is an advanced automation workflow that requires some time and effort, but it’s absolutely worth it to significantly boost your ROI from Facebook lead generation.
By implementing it, you can:
1. Track lead ‘stage’ or ‘status’ changes in your CRM
2. Send this information back to Facebook
3. Optimize your campaigns to win leads which are more likely to convert
Who should use this automation?
This automation will only get results if you’re able to meet these requirements:
✅ Leads must be coming from Facebook lead ads
✅ Your CRM must be capturing all ‘lead IDs’ when the lead arrives (you can set this up as a custom field in your CRM or a separate column in your database)
✅ You must confirm receipt of leads with Facebook as soon as leads arrive (this can also be automated with Make – the guide below will show you how)
✅ Facebook must be generating at least 200 leads per month
✅ Leads should progress to the stage you want to optimize for within 28 days
✅ Conversion rates for the stage you want to optimize for should be between 1-40%
Make apps required for this automation
How to set up conversions API for CRM on Make Step 1: Create a new pixel in Facebook
For your Facebook ads to run, you will have already created a web pixel within Facebook. However, for this automation to work effectively, you need to set up a standalone pixel to receive offline events from your CRM.
Here’s how to do this:
1. Go to Events Manager in your Facebook Ads account
2. Click ‘Connect Data Sources’ and select ‘CRM’
3. Create a new standalone pixel for CRM events (don't use your existing web pixel)
Step 2: Set up Make scenarios
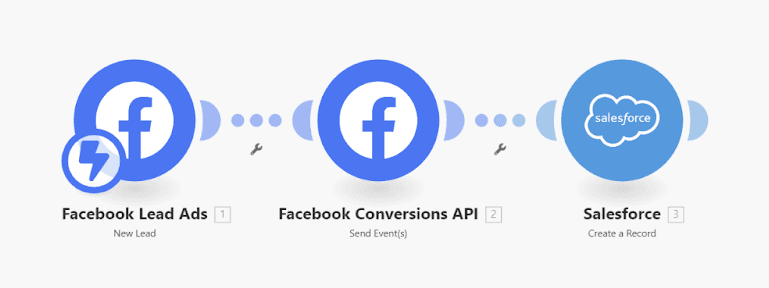
Make scenario 1: Marking leads as ‘received’ and creating leads in your CRM
For this automation to work effectively, It’s absolutely essential that you confirm receipt of all leads with Facebook. Luckily, this is quick and easy to automate using Make.
Follow these steps:
1. Use the Facebook Lead Ads app to capture new leads
2. Connect to the Facebook Conversions API app to immediately send the ‘lead received’ event back to Facebook with timestamp and lead ID. This is a very important step – don’t be tempted to skip it.
3. Create and store every lead in your CRM, automatically adding the lead ID to a custom field (you will need to design this in your CRM before starting this module).
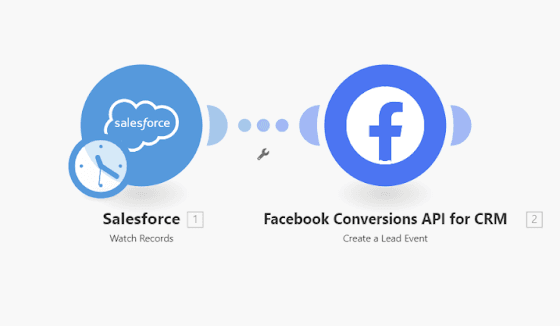
Make scenario 2: Sending lead status changes
This is where it starts to get interesting! Next we’ll use Make to automatically tell Facebook about changes in the status of the Facebook-generated leads stored in your CRM.
Here’s how:
1. Create a simple scenario that watches for lead status changes in your CRM
2. Connect to the Facebook Conversions API for CRM Make app. Map the status of leads to the ‘event name’ field and the lead ID to the custom field already created.
3. Be sure to configure your connection to Facebook, choosing the standalone pixel set up in step 1.
4. When a lead status changes in your CRM, for instance, it gets marked as ‘contract signed’ or ‘pending contact’, Make will capture this information and transfer it to Meta.
Step 3: Tweaking your sales funnel in Facebook
Once seven days of historical events have been successfully passed back to Facebook, it’s time for step three.
This is where we tell Facebook which statuses (or stages) are used in your CRM (you need a minimum of two), what order they happen in and which are considered ‘good’.
1. Go to your pixel settings in Events Manager
2. Navigate to the ‘Modify Sales Funnel’ section
3. Order your CRM statuses logically
4. Select which statuses you consider ‘good’ for optimization (this might be ‘contract pending’ or ‘contract signed’)
Step 4: Optimize your ad campaigns
The final step is to change the ad set optimization from a ‘cost per lead’ target to conversion leads-based optimization.
1. In Ads Manager, go to your ad set settings
2. Change the optimization method from ‘Leads’ to ‘Conversion Leads’
3. Select your CRM pixel as the conversion event source
Remember to continually monitor and adjust your setup to ensure optimal performance.
Ready to supercharge your Facebook lead ads?
Download our free ebook to learn how to get better quality leads across Meta (Facebook and Instagram) using the automation power of Make.

