Azure DevOps
With Azure DevOps modules in Make, you can manage and monitor the work items, git events, and code events in your Azure DevOps account.
To use the Azure DevOps modules, you must have an Azure DevOps account. You can create an account at azure.microsoft.com.
Refer to the Azure DevOps API documentation for a list of available endpoints.
Make provides two ways to connect the Azure DevOps app:
Azure DevOps
Azure DevOps (Azure App OAuth)
To establish the connection, you must:
Log in to your Azure DevOps account.
If you don't have a created organization, click Create new organization, enter a name, and click Create.
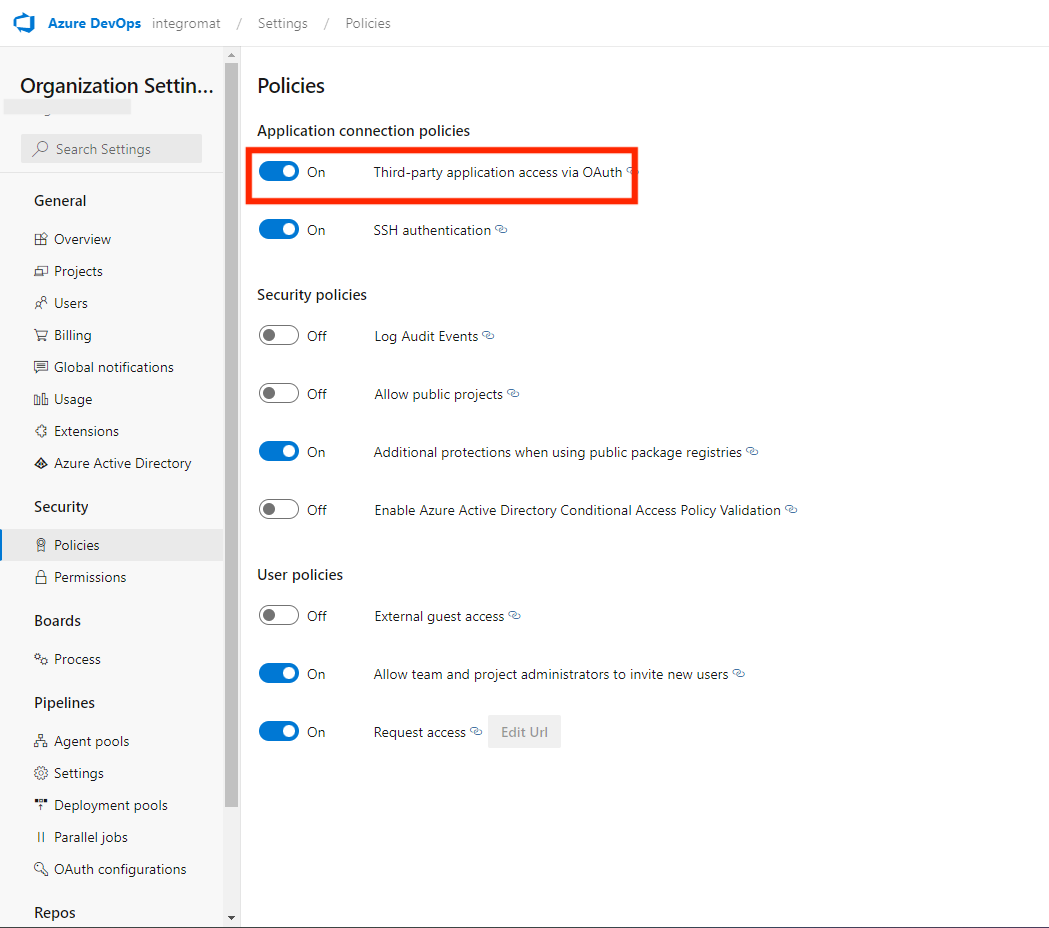
In the left sidebar, click Organization settings > Policies.
Enable the option Third-party application access via OAuth.
Copy the organization name located under the Organization Settings.
Log in to your Make account, add a Azure DevOps module to your scenario, and click Create a connection.
Note: If you add a module with an
instanttag, click Create a webhook, then Create a connection.Optional: In the Connection name field, enter a name for the connection.
In the Organization field, enter the organization name copied above.
Optional: Click Show advanced settings and enter your custom app client credentials. For more information, refer to the Azure DevOps OAuth 2.0.
If requested, use the following Redirect URI when creating your custom app:
https://www.integromat.com/oauth/cb/azure-devops.Click Save.
If prompted, authenticate your account and confirm access.
You have successfully established the connection. You can now edit your scenario and add more Azure DevOps modules. If your connection requires reauthorization at any point, follow the connection renewal steps here.
To establish the connection, you must:
Note
Selecting too many scopes will result in a Requested query string is too long error.
Log in to your Azure DevOps account.
If you don't have a created organization, click Create new organization, enter a name, and click Create.
In the left sidebar, click Organization settings > Policies.
Enable the option Third-party application access via OAuth.
Copy the organization name located under the Organization Settings.
Log in to your Make account, add a Azure DevOps module to your scenario, and click Create a connection.
Note: If you add a module with an
instanttag, click Create a webhook, then Create a connection.Optional: In the Connection name field, enter a name for the connection.
In the Organization field, enter the organization name copied above.
In the Scopes field, add the additional scopes to your connection as needed. For more information about the scopes, refer to the Azure DevOps OAuth 2.0 documentation.
Optional: Click Show advanced settings and enter your custom app client credentials. For more information, refer to the Azure DevOps OAuth 2.0.
If requested, use the following Redirect URI when creating your custom app:
https://www.make.com/oauth/cb/azure-devops2.Click Save.
If prompted, authenticate your account and confirm access.
You have successfully established the connection. You can now edit your scenario and add more Azure DevOps modules. If your connection requires reauthorization at any point, follow the connection renewal steps here.
Triggers
You can watch work items, gists, and event code using the following modules.
Note
Make automatically creates a webhook in Azure DevOps once you add an instant trigger to your scenario.
Triggers when an event for work item happens.
Webhook Name | Enter a name for the webhook. |
Connection | |
Event Type | Select the event type you want to watch. |
Triggers when an event for git happens.
Webhook Name | Enter a name for the webhook. |
Connection | |
Event Type | Select the event type you want to watch. |
Triggers when an event for code happens.
Webhook Name | Enter a name for the webhook. |
Connection | |
Event Type | Select the event type you want to watch. |
Work Items
You can search, create, update, and retrieve work items using the following module.
Searches work items by type or returns them all.
Connection | |
Project | Select or map the project whose work items you want to search. |
Team | Select or map the team whose work items you want to search. |
Item Type | Select or map the item type whose work items you want to search. |
Limit | Set the maximum number of work items Make will return during one execution cycle. |
Creates a new work item.
Connection | |
Project | Select or map the project in which you want to create the work item and enter the details. |
Item Type | Select or map the item type and enter its information to create the work item. |
Retrieves details about a specific work item.
Connection | |
Project | Select or map the project's work item details you want to retrieve. |
Work Item ID | Click Search ID and select the work item whose details you want to retrieve. |
Updates a specific work item.
Connection | |
Project | Select or map the project whose work item details you want to update. |
Item Type | Select or map the item type whose details you want to update. |
Work Item ID | Click Search ID and select the work item whose details you want to update. Enter the details to update the work item. |
Other
Performs an arbitrary authorized API call.
Note
For the list of available endpoints, refer to the Azure DevOps API documentation.
Connection | |
URL | Enter a path relative to |
Method | GET to retrieve information for an entry. POST to create a new entry. PUT to update/replace an existing entry. PATCH to make a partial entry update. DELETE to delete an entry. |
Headers | Enter the desired request headers. You don't have to add authorization headers; we already did that for you. |
Query String | Enter the request query string. |
Body | Enter the body content for your API call. |