OpenAI (ChatGPT, Whisper, DALL-E)
With OpenAI (ChatGPT, Whisper, DALL-E) modules in Make, you can create chat or prompt completions, edits, and moderations, generate images, manage files and batches, and call APIs.
To get started with OpenAI, you need an OpenAI account.
Note
Make modules support GPT-3.5, GPT-4, GPT-4o, GPT-4o mini, GPT-4.5, o1 and o3 models, provided the user has access.
Connect OpenAI to Make
To connect OpenAI to Make, you must obtain an API Key and Organization ID from your account.
Important
To use this app, you must have credit in your OpenAI account. You can buy credits on the OpenAI billing page.
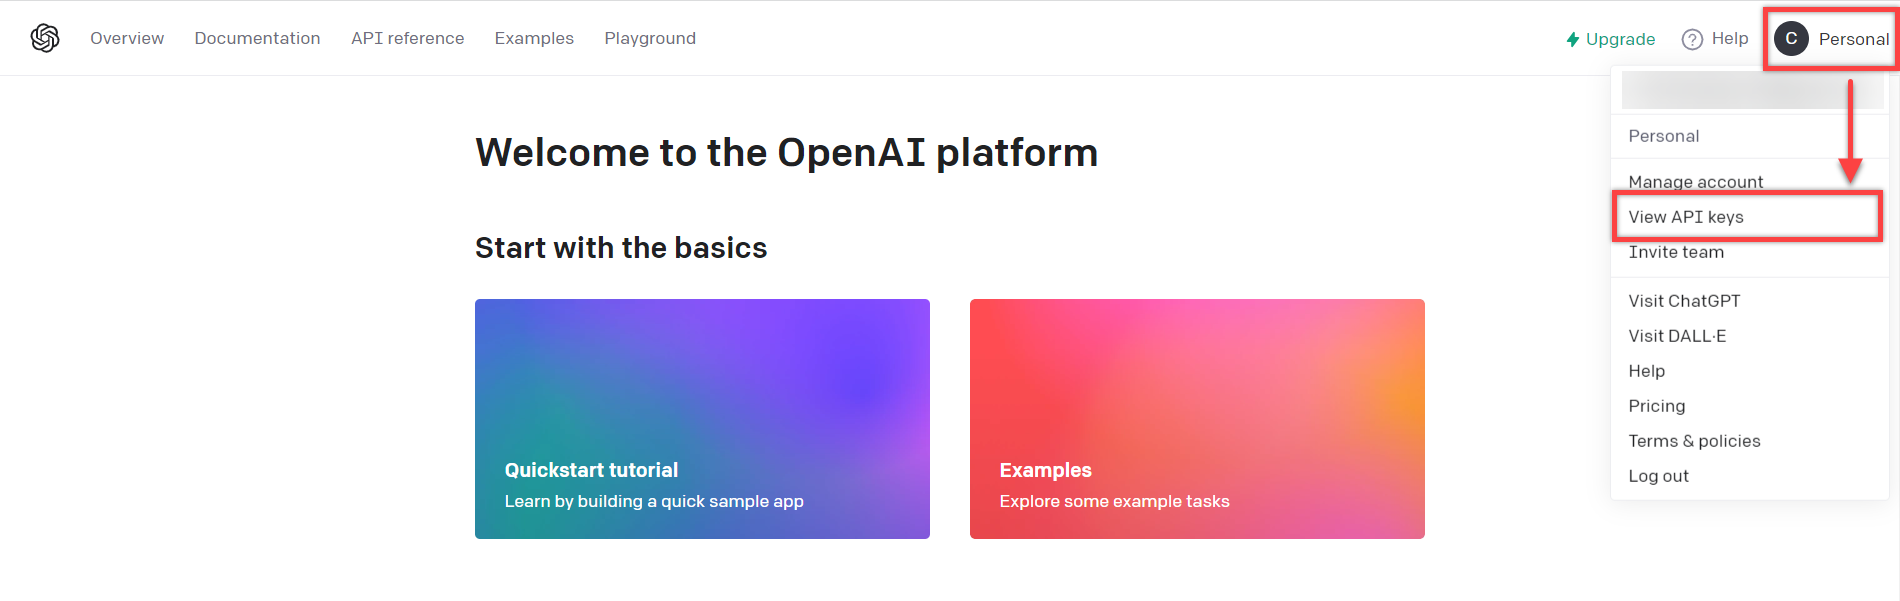
Log in to your OpenAI (ChatGPT, Whisper, DALL-E) account.
Click on your profile icon in the top right corner > View API Keys.
Click Create new secret key, give the key a name (optional), and click Create secret key.
Copy the secret key, store it in a safe place as you will not be able to view it again, and click Done.
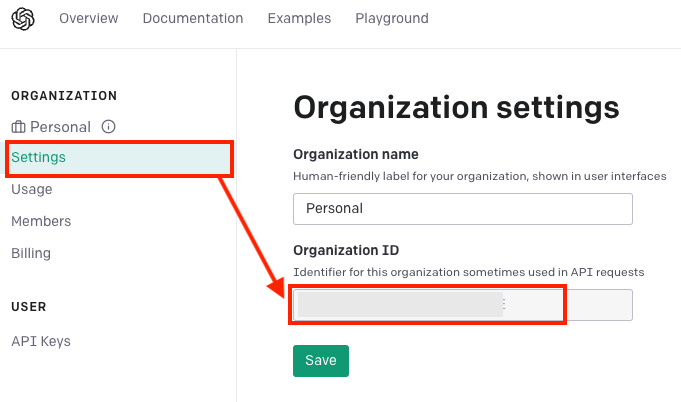
Go to your account settings page and copy your Organization ID to your clipboard.
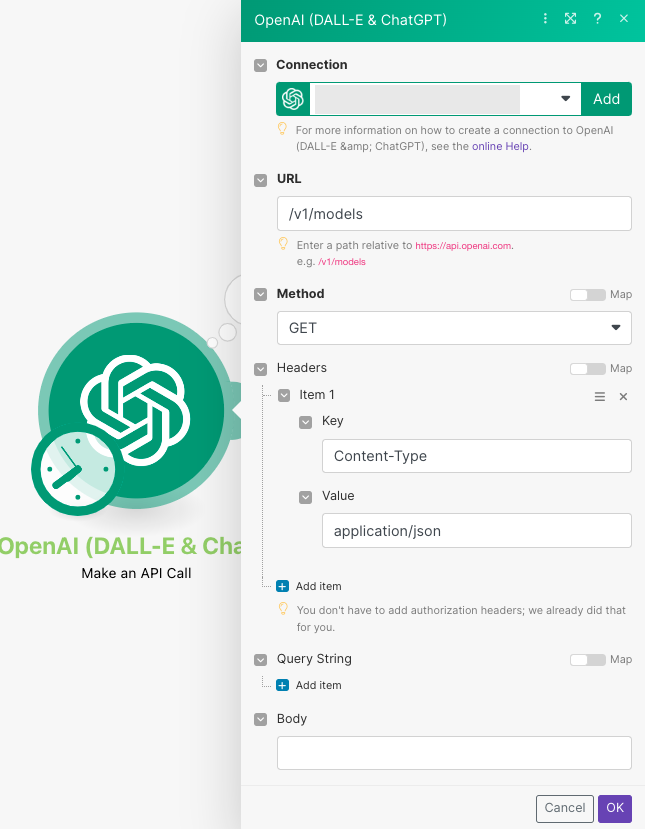
Log in to your Make account, add an OpenAI (ChatGPT, Whisper, DALL-E) module to a scenario, and click Create a connection.
Optional: In the Connection name field, enter a name for the connection.
In the API Key field, enter the secret key copied in step 4.
In the Organization ID field, enter the organization ID copied in step 5 and click Save.
You have successfully established the connection. You can now edit your scenario and add more OpenAI (ChatGPT, Whisper, DALL-E) modules. If your connection needs reauthorization at any point, follow the connection renewal steps here.
Triggers
Triggers when a batch is completed
Connection | |
Limit | Enter the maximum number of results to be worked with during one execution cycle. |
AI
Send messages to a specified or newly created thread and execute it seamlessly. This action can send the arguments for your function calls to the specified URLs (POST HTTP method only). Works with Assistants v2.
Connection | |
Assistant | Select or map the assistant you would like to use. |
Role | Indicate whether to send a message on behalf of the user or the assistant. |
Message | Enter the message to send to the Assistant. |
Image Files | Select images you want to include. Map or select the binary data of the image. You can retrieve the binary data of an image using the HTTP: Get a file module, or another app such as Dropbox. Images are only supported on certain models. For more information, see OpenAI Vision-compatible models. |
Image URLs | Add images you want to include. Enter the URL address to a public resource of the image. For example, https://getmyimage.com/myimage.png. Images are only supported on certain models. For more information, see OpenAI Vision-compatible models. |
Thread ID | Enter the Thread ID where the message will be stored. To find your Thread ID, go to the OpenAI Playground, open your assistant, and the Thread ID will be visible. If Thread ID is left empty, we will create a new thread. You can find the new thread's Thread ID value in the module's response. |
Tool Choice | Select the tool that is called by a model. The options are:
|
Model | Select or map the model you want to use. NoteEnsure you have access to the model you want to work with. Only models available for the account are listed for selection. |
Tools | Specify tools in order to override the tools the assistant can use when generating the response. |
File Source Resources | Select the vector store that will become available to the File Search tool in this thread. |
Code Interpreter Resources | Select the files that will become available to the Code Interpreter tool in this thread. |
Instructions | Enter instructions in order to override the default system message of the assistant when generating the response. |
Max Prompt Tokens | The maximum number of tokens to use in the prompts (input including files). If the run exceeds the number of prompt tokens specified, the run will end with the |
Max Completion Tokens | The maximum number of tokens to use in the completion (output). If the run exceeds the number of prompt tokens specified, the run will end with the NoteThe o1 models require tokens for both output and reason. Insert the sum of both tokens if you use the o1 models. Refer to Open AI Platform documentation to learn more. |
Temperature | Specify the sampling temperature to use. Higher temperatures generate more diverse and creative responses. For example, The value must be lower than or equal to 2. |
Top P | Specify the Top P value to use nucleus sampling. This will consider the results of the tokens with probability mass. The default value is The value must be lower than or equal to 1. |
Response Format | Select the format in which the response will be returned. |
Parse JSON Response | If you selected JSON Object for the Response Format, you can choose whether or not the response will be parsed. |
Truncation Strategy | Select the truncation strategy for the response. |
Creates a completion for the provided prompt or chat.
See the OpenAI model endpoint compatibility section for the list of supported models.
Connection | |
Select Method | Select a method to create a completion. |
Model | Select or map the model you want to use:
NoteEnsure you have access to the model you want to work with. Only models available for the account are listed for selection. |
Messages | Add the messages for which you want to create the completion by selecting the Role and entering the Message Content. For some models you can manage image input type and image details as well as audio filename and audio data. For more information about chat completion, refer to the OpenAI documentation. |
Max Completion Tokens | The maximum number of tokens to generate in the completion. The default value is 2048. NoteLow values may cause the output to be truncated. High values may use a lot of OpenAI credit. The o1 and o3 models require tokens for both output and reason. Insert the sum of both tokens if you use the o1 and o3 models. Refer to OpenAI Platform documentation to learn more about reasoning modules. |
Predicted outputs | Enter the content that is going to be used as a predicted output. This is often the text of a file you are regenerating with minor changes. Predicted Outputs are available for the latest gpt-4o and gpt-4o-mini models. For more information, refer to OpenAI Predicted Outputs documentation. |
Temperature | Specify the sampling temperature to use. A higher value means the model will take more risks. Try 0.9 for more creative applications and 0 (argmax sampling) for ones with a well-defined answer. Defaults to 1. |
Top P | An alternative to sampling with temperature is called nucleus sampling, where the model considers the results of the tokens with top_p probability mass. So 0.1 means only the tokens comprising the top 10% probability mass are considered. Defaults to 1. |
Number | The number of completions to generate for each prompt. Defaults to 1. |
Frequency Penalty | Positive values penalize new tokens based on their existing frequency in the text so far, decreasing the model's likelihood to repeat the same line verbatim. This value must be a number between -2 and 2. |
Presence Penalty | Positive values penalize new tokens based on whether they appear in the text so far, increasing the model's likelihood to talk about new topics. This value must be a number between -2 and 2. |
Token Probability | Add the token probability by selecting the Token and Probability. The Probability must be a number between -100 and 100. |
Response Format | Choose the format for the response. |
Reasoning Effort | Constrain the effort on reasoning for reasoning models by selecting low, medium, or high. Reducing the reasoning effort can result in faster responses and fewer tokens used on reasoning in a response. Defaults to |
Audio Output Options | If you selected the GPT-4o: gpt-4o-audio-preview model and Audio + text response format, you need to indicated a voice and an audio format in the Voice and File Format fields accordingly. |
Parse JSON Response | If you selected JSON Object for the Response Format, you can choose whether or not the response will be parsed. |
Seed | This feature is in Beta. If specified, our system will make a best effort to sample deterministically, such that repeated requests with the same seed and parameters should return the same result. Refer to the For more information, refer to the OpenAI documentation. |
Stop Sequences | Add up to 4 sequences where the API will stop generating further tokens. |
Other Input Parameters | Add any additional input parameters by selecting the Parameter Name , the Input Type, and entering the Parameter Value. For more information, refer to the OpenAI documentation. |
Identifies specified information in a prompt's raw text and returns it as structured data.
Connection | |||||||||||||||
Model | Select or map the model you want to use. NoteEnsure you have access to the model you want to work with. Only models available for the account are listed for selection. | ||||||||||||||
Text to Parse | Enter the text containing the data that you want to transform. | ||||||||||||||
Prompt | Enter a short description explaining what type of data should be extracted from the text entered above. | ||||||||||||||
Structured Data Definition | Enter parameters or map the way in which the structured data should be returned.
| ||||||||||||||
Object Definitions | Enter parameters or map the way in which the objects should be returned.
|
Accepts an array of images as an input and provides an analysis result for each of the images following the instructions specified in the prompt.
Connection | |
Prompt | Enter instructions for how to analyze the image(s). |
Images | Add or map the images you want to analyze. You can add images by entering an Image URL or Image file data. Image URL: Enter the URL address to a public resource of the image. For example, Image file: Map or select the binary data of the image. You can retrieve the binary data of an image using the HTTP: Get a file module, or another app such as Dropbox. |
Model | Select or map the model you want to use. NoteEnsure you have access to the model you want to work with. Only models available for the account are listed for selection. |
Max Completion Tokens | Enter the maximum number of tokens to use for the completion. The default value is 2048. |
Temperature | Specify the sampling temperature to use. Higher temperatures generate more diverse and creative responses. For example, The value must be lower than or equal to 2. |
Top P | Specify the Top P value to use nucleus sampling. This will consider the results of the tokens with probability mass. The default value is The value must be lower than or equal to 1. |
Number | Enter the number of responses to generate. If more than 1 response is generated, the results can be found in the module's output within Choices. The default value is |
Generates an image with DALL E given a prompt.
Connection | |
Model | Select or map the model you want to use. NoteEnsure you have access to the model you want to work with. Only models available for the account are listed for selection. |
Prompt | Enter details of the images you want to generate. The maximum number of characters allowed is 1000 if your model is Dall-E 2 and 4000 if your model is Dall-E 3. |
Size | Select or map the size of the images to generate. It must be one of |
Number | Enter the number of images to generate. Enter a number between 1 and 10. |
Response Format | Select or map the format in which the generated images are returned. If you select |
Quality | Select the quality of the generated image. HD generates images with finer details and greater consistency across the image. |
Edits or extends an image.
Connection | |
Image | Enter an image to edit. The file must be in PNG format, less than 4 MB, and square. If a Mask file is not provided, the image must have transparency, which will be used as the mask. |
Prompt | Enter details of the images you want to edit. The maximum number of characters allowed is 1000. |
Mask | Enter an additional image with fully transparent areas (where alpha is zero). The transparent areas indicate where the Image will be edited. The file must be in PNG format, less than 4 MB, and the same dimensions as Image above. |
Number | Enter the number of images to generate. Enter a number between 1 and 10. |
Size | Select or map the size of the images to generate. It must be one of |
Response Format | Select or map the format in which the generated images are returned. If you select |
Creates a translation of an audio into English.
Connection | |
File Name | Enter the name of the file you want to translate. |
File Data | Enter the data of the file you want to translate. |
Model | Select or map the model you want to use. Refer to the OpenAI Audio API documentation for information on available models. NoteEnsure you have access to the model you want to work with. Only models available for the account are listed for selection. |
Prompt | Enter text to guide the model's style or continue a previous audio segment. (Optional) The prompt should be in English. |
Temperature | Enter a sampling temperature between 0 and 1. Higher values, such as 0.8, will make the output more random. Lower values, such as 0.2, will make it more focused and deterministic. |
Creates a transcription of an audio to text.
Connection | |
File Name | Enter the name of the file you want to transcribe. |
File Data | Enter the data of the file you want to transcribe. |
Model | Select or map the model you want to use. Refer to the OpenAI Audio API documentation for information on available models. NoteEnsure you have access to the model you want to work with. Only models available for the account are listed for selection. |
Prompt | Enter text to guide the model's style or continue a previous audio segment. (Optional) The prompt should be in the same language as the audio. |
Temperature | Enter a sampling temperature between 0 and 1. Higher values, such as 0.8, will make the output more random. Lower values, such as 0.2, will make it more focused and deterministic. |
Language | Enter the two letter ISO code of the input audio's language. |
Qualifies whether the provided image or text(s) contains violent, hateful, illicit, or adult content.
Connection | |
Input format | Select the format of the input content:
|
Input text | Enter the text for which you want to create the moderation. The module will classify the content against OpenAI's Content Policy. |
Model | Select or map the model you want to use. If empty, the default model will change based on the selected input format. |
Generates an audio file based on the text input and settings specified.
Connection | |
Input | Enter text to generate into audio. The text must be between 1 and 4096 characters long. |
Model | Select or map the model you want to use. NoteEnsure you have access to the model you want to work with. Only models available for the account are listed for selection. |
Voice | Select or map the voice to use in the audio. For voice samples, see the OpenAI Voice Options guide. |
Output Filename | Enter a name for the generated audio file. Do not include the file extension. |
Response Format | Select or map the file format for the generated audio file. |
Speed | Enter a value for the speed of the audio. This must be a number between 0.25 and 4. |
Files
Adds files to a specified vector store or, if not specified, creates a new vector store based on the configuration.
Connection | |
Batch Create Mode | Choose if you would like to create a new vector store or choose an existing vector store. |
Vector Store ID | Select the vector store. |
Vector Store Name | Enter a name for a new vector store. |
Days Expires After | Enter the number of days of inactivity for the vector store. When the specified amount of days have passed, the vector store expires. |
File IDs | Select the files to add to a vector store. For a list of supported file formats, see Open AI File Search supported files. |
Uploads a file that will be available for further usage across the OpenAI platform.
Connection | |
File Name | Enter the name of the file to be uploaded, including the file extension. For example, Supported file types depend on the option selected in the Purpose field below. The Fine Tune purpose supports only .jsonl files. See the Assistants Tools guide to learn more about the supported file types. |
File Data | Enter the file data to be uploaded. You can retrieve file data using the HTTP: Get a file module. |
Purpose | Select or map the purpose. Select Assistants for Assistants and Messages and Fine Tune for Fine-tuning. |
Batches
Retrieves a list of batches.
Connection | |
Limit | Enter the maximum number of returned results (bundles). |
Retrieves details of the specified batch.
Connection | |
Batch ID | Select a batch to retrieve. |
Creates and executes a batch of API calls.
Connection | |
Input File ID | Select a file to use as input to create a batch. |
Endpoint | Select the endpoint to use for all requests in the batch. Note that |
Cancels an in-progress batch. The batch will be in status "cancelling" for up to 10 minutes before changing to "cancelled", where it will have partial results (if any) available in the output file.
Connection | |
Batch ID | Select a batch to cancel. |
Other
Performs an arbitrary authorized API call.
Note
For the list of available endpoints, see OpenAI ChatGPT API Documentation.
Connection | |
URL | Enter a path relative to |
Method | GET to retrieve information for an entry. POST to create a new entry. PUT to update/replace an existing entry. PATCH to make a partial entry update. DELETE to delete an entry. |
Headers | Enter the desired request headers. You don't have to add authorization headers; we already did that for you. |
Query String | Enter the request query string. |
Body | Enter the body content for your API call. |
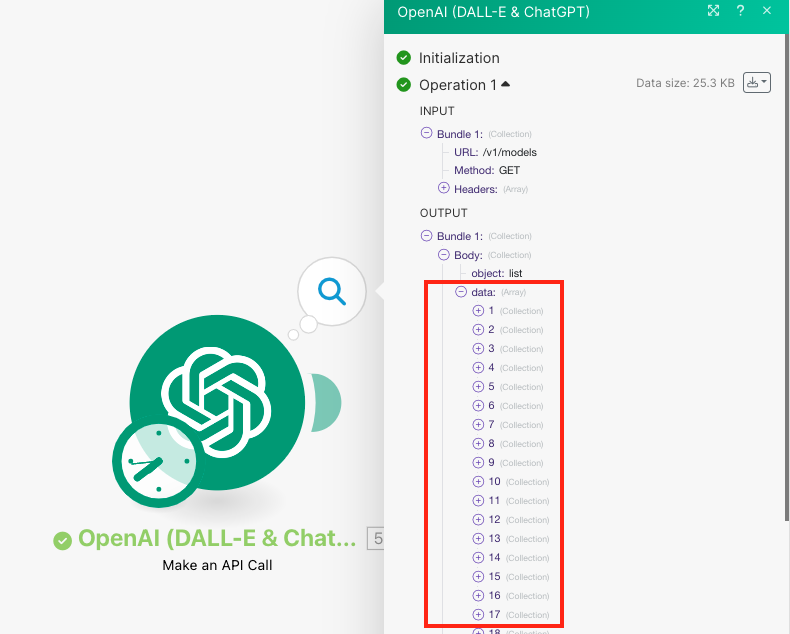
Examples of Use - List Models
The following API call returns all pages from your OpenAI account.
URL:/v1/models
Method: GET
The search matches can be found in the module's Output under Bundle > Body > data.
In our example, 69 models were returned: